Subscribe Portal 2.0 Frequently Asked Questions (FAQ)
Billing FAQs
Q: How do I search for AutoBills?
A: AutoBills have been renamed Subscriptions in Subscribe Merchant Portal 2.0 and Subscribe REST API.
To search for Subscriptions, go to and search for the relevant subscription.
For more details:
- To learn about Subscriptions, see Subscriptions for general info and Subscription Lifecycle for subscription usage over time.
- To learn more about searching for Subscriptions, see Filtering Subscriptions.
- To work with subscriptions in the Portal, see Working with Subscriptions.
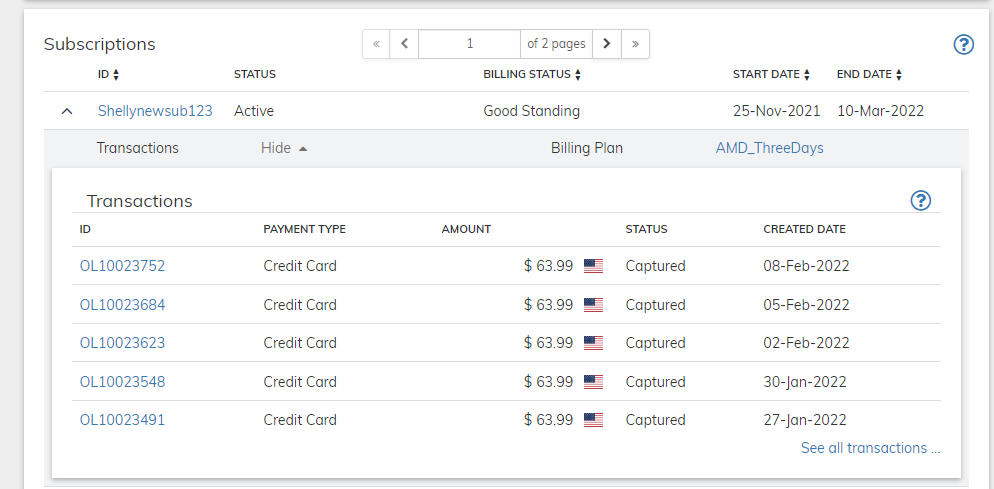
Q: Can I see all paid Transactions on an Account?
A: Yes. For this scenario, search for the customer Account that you seek from . To learn more about searching for Accounts, see Filtering Accounts.
.
Q: How do I cancel a Subscription (AutoBill)?
A: In order to cancel a subscription, you must first locate the subscription in . To learn more about searching for Subscriptions, see Filtering Subscriptions.
Once you locate the subscription, click the Cancel Subscription button in the Actions panel.
For more details, see Cancel a Subscription.
Q: How do I create a new customer?
A: In Subscribe Portal 2.0, most entities are created as part of the New button, located at the top left of the screen. Use it to create a new Account for your customer.
For more details about creating new Accounts, see Working with Accounts.
Q: Why can't I edit customer accounts?
A: Subscribe is a role based web application. You are given permissions to perform certain actions according to the role assigned to you. Your account administrator is responsible for assigning users Subscribe roles. For more details, see Subscribe Portal User Roles.
Q: Where is the Merchant Customer ID field for searching accounts?
A: Subscribe Merchant Portal 2.0 provides advanced filtering capabilities. To search for a customer account, go to .
The filter screen allows you to search for the account you need. In this screen, ID refers to the Account ID ,which is the name used for Merchant Customer ID in Portal 2.0. For details about the other filtering options, see Filtering Accounts.
Q: How can I save my search results as a CSV file in Subscribe Portal 2.0?
A: In Subscribe Portal 1.0, it was possible to run a search with specific search criteria and download the resulting list as a CSV file.
In Subscribe Portal 2.0, this functionality can be achieved by running reports for the data.
The most common use cases for this functionality is searching for Transactions or Subscriptions. So let's focus on those.
| Searching and downloading file for recent Transactions | Searching and downloading file for recent Subscriptions |
|---|---|
| About: In order to achieve this result we'll be running the Transaction Detail Report,the generated report is downloaded as a CSV file. If you need current (near real-time data), use Reports 1.0. If you're searching for data more than 48 hours old, use Reports 2.0 Reports 1.0 allows selecting the display columns in the report. | About: In order to achieve this result we'll be running the Active Subscription Detail Report, the generated report is downloaded as a CSV file. If you need current (near real-time data), use Reports 1.0. If you're searching for data more than 48 hours old, use Reports 2.0 Reports 1.0 allows selecting the display columns in the report. |
How to:
| How to:
|
| Output: When the report is generated, you'll have a CSV file listing the relevant Transactions you were searching for and displaying only the columns you indicated. | Output: When the report is generated, you'll have a CSV file listing the relevant Subscriptions you were searching for and displaying only the columns you indicated. |
Vindicia IDP and Multi-Factor Authentication
Q: What is Vindicia IDP?
A: Vindicia IDP, is Vindicia's advanced Identity Provider for merchant user authentication and login to Vindicia's Merchant Portals. Vindicia IDP is available for Subscribe and Retain merchants for accessing Vindicia Subscribe Merchant Portal and Retain Merchant Portal.
Vindicia's IDP supports all PCI and ISO required security measures such as complex passwords, Multi-Factor Authentication, and the use of unique passwords. It also provides an additional security layer for Vindicia portals, helping to protect against unauthorized access.
Merchant users will be responsible for creating their own passwords and defining multiple verification methods in a simple-to-use Identity Provider app.
Also, Vindicia IDP will provide admins User Management capabilities for the merchant users, such as disabling and enabling users, resetting passwords, and resetting multi-factor authentication factors. These were previously unavailable for Merchant staff. The creation of new users will still require a request submitted to Vindicia Client Technical Support.
How do I use Vindicia IDP?
A: Users will receive an email providing their Vindicia ID (username) and prompting them to the Vindicia Portal via the Vindicia IDP app. Here you'll set up your password and define multi-factor authentication either via email or via an authenticator app.
Learn how to access the Portal with Vindicia IDP.
For Multi-Factor Authentication set up, you can use either your email as an identifying factor or an authenticator app, Most authentication Apps are supported. You can use a common one such as MS Authenticator or Google Authenticator. Download the app from your mobile device app store such as Google Play or Apple App store.
Once you've logged in via Vindicia IDP, you can always access it to change your password and other details. User the link available in your Settings page. For more details, see User Sign In - Vindicia IDP.
Q: What is Multi-Factor Authentication (MFA)
A: Multi-Factor Authentication is a secure authentication method requiring identity verification by supplying two or more identifying details (also called factors) when a user logs in.
MFA is an effective way to increase protection for user accounts against common threats like phishing attacks, credential stuffing, and account takeovers. It adds another layer of security to the login process by requiring users to enter two or more pieces of evidence — or factors — to prove they’re who they say they are.
Typically the first factor is something the user knows, such as their username and password combination. Additional factors are often verification methods that the user has in their possession, such as an authenticator app, a phone number, or security key.
A familiar example of MFA, is the two factors needed to withdraw money from an ATM. Your ATM card is something that you possess and your PIN is something you know. By tying user access to multiple, different types of authentication factors, it’s much harder for a bad actor to succeed.
For Vindicia IDP, you will use:
- Username and password as your first factor- something you know.
- One time code sent to your email or an Authenticator App - something you possess.
Q: Why is Vindicia requiring log in via Vindicia IDP?
A: The global security threat landscape is constantly evolving, and the types of attacks that can cripple a business and exploit consumers data are on the rise. Today it’s more important than ever to implement stronger security measures. Multi-Factor Authentication (MFA) is one of the easiest, most effective tools for enhancing login security, and safeguarding your business and your data against security threats.
Vindicia IDP provides Multi-Factor Authentication (MFA), a secure authentication method requiring identity verification by supplying two or more identifying details (also called factors) when a user logs in. The first factor is often a common detail (factor) such as username and password. Additional verification factors can be authentication by an authenticator app, or an email-delivered one-time password. These additional verification factors, provide additional security for user access and make it much harder for scammers using phishing attacks and account takeovers to succeed.

As part of Vindicia's compliance with PCI and other strict security protocols, Multi-Factor Authentication is required.
Q: Is Vindicia requiring merchants to enable MFA?
A: Effective April 1, 2023, Vindicia merchants are required to use MFA to access Vindicia Portals. New merchants will be provided access via Vindicia IDP. Existing merchants will be moved over to Vindicia IDP in a phased approach between April and June 2023.
Optionally, Merchants already utilizing an OIDC-based Identity Management system enabled with MFA such as OKTA, or Microsoft Azure can request to use their own Identity provider and integrate authentication to Vindicia Portals. To learn more, see Vindicia External User Authentication Requirements.
Q: I'm the Admin, How can I manage our other merchant users?
A: Once Vindicia IDP is active for your organization, you, the merchant admin (super user), are able and responsible for managing your users using the new Vindicia IDP Care console.
As a merchant admin, you can perform User Management actions such as disabling and enabling users, resetting passwords, and resetting multi-factor authentication factors. This is new functionality, previously unavailable for Merchant staff.
You will receive a link to your organizational Care console URL.
To learn more about managing your Merchant users, see Vindicia IDP Care Console Guide.
Q: How can I access the Vindicia IDP Care console?
A: Merchant admins (super users) can access the Vindicia IDP Care console through the Merchant Portal by clicking Manage Users in the top right corner of their screen.
Report FAQs
Q: Where do I find my Scheduled Report?
A: Subscribe provides a reporting interface that allows you to create either one time on demand reports or recurring scheduled reports. All reports are available as CSV files, and can be viewed in a spreadsheet application.
Access your completed reports from .
For more details, see My Reports.
Q: Where do I generate the Active AutoBills Report?
A: In general, running one time or recurring reports is performed from . For more details on how to run a reports, see Working with Reports.
Active AutoBills Report is now called Active Subscriptions Report. It appears as part of the Subscription pane in the Run Reports page.You can run it either using the Reports 1.0 data engine or Reports 2.0 data engine. For more details about the report, see Active Subscriptions Report.
Once generated and completed, you'll find the report under .
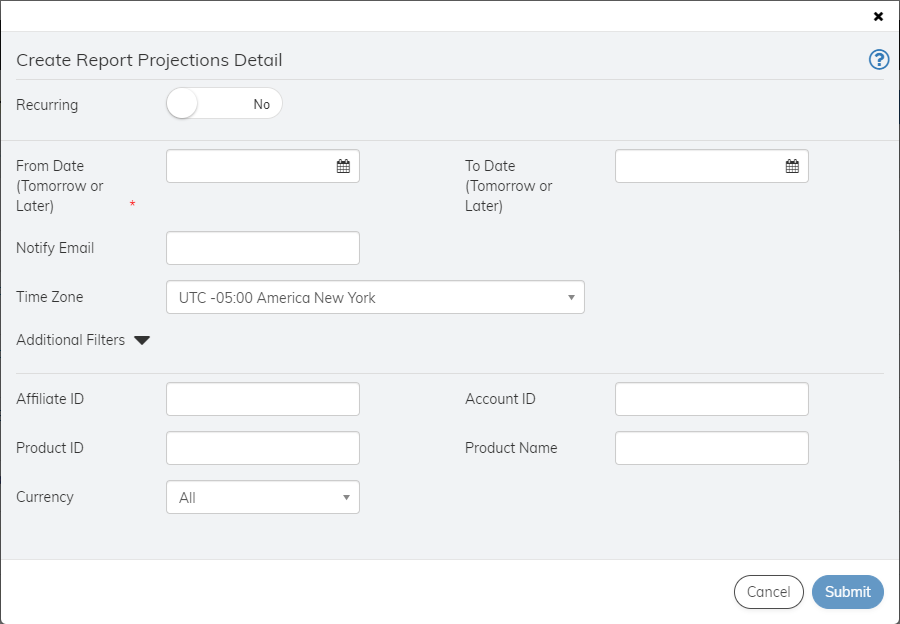
Q: How do I generate a daily Transaction Report?
A: In order to generate a list of the daily Transactions created, use Reports 1.0 that provides near real-time data. Schedule this report on a daily basis and it will generate for you and notify you when available.
- In Subscribe Portal 2.0, go to .
- Find the Transactions Detail Report in the Transaction pane.
- Select the Reports 1.0 checkbox.
- Click the Run button. The report's create dialog box appears.
- Move Recurring toggle to Yes.
- Select a date for the first reporting period.
- Select Daily for the report's Frequency value.
- Enter an Email address where you'd like to receive notifications when the report is available.
- Enter any additional filters you need such as Affiliate ID or Currency.
- Expand the Display columns and select which columns you'd like to include in the report.
- Click Submit.
View the report (when it's available) in the My Reports page. You'll receive an email notification daily when it is generated.
Using Reports 1.0, you can select which columns to display in the file.
Q: How do I change the time zone shown in the report?
A: For Reports 2.0, the report data is displayed based on the time zone that you defined for yourself in Subscribe's Portal My Settings.
To change the defined time zone, go to and change the selected Time Zone.
For more details, see My Settings.
Alternatively, you can select a different time zone in the report's dialog box itself when using Reports 2.0 data engine.
Q: Why can't I choose which Display Column to include in a Report?
A: Subscribe Reports are generated by two reporting engines, Reports 1.0 and the new Vindicia Data Platform Reports 2.0. For Reports 2.0 the report includes all the available columns and the users no longer need to choose which columns to display.
Both Reports 1.0 and Reports 2.0 can be generated in Portal 2.0. Use Reports 1.0 if you'd like to select which display columns to display in the Report's CSV file.
The report itself is delivered as a CSV file and can be displayed as a spreadsheet. You can then control the column appearance and order.
Q: Which reports are enabled by Vindicia Data Platform - Reports 2.0?
A: You can generate all the Subscribe reports from Subscribe Portal 2.0 and for most select which data platform should generate the report- Reports 1.0 or Reports 2.0.
For a list of reports generated by Vindicia data Platform Reports 2.0, see Subscribe Reports using the Vindicia Data Platform. In the My Report screen, you can see which engine was used to generate the report.
Naming FAQs
Q: What names have been changed from Subscribe Portal 1.0 to Subscribe Portal 2.0?
A: See the following table for a list of naming changes:
| Area | Portal 1.0 Name | Portal 2.0 Name |
|---|---|---|
| Subscriptions | AutoBill ID | Subscription ID |
| Merchant Customer ID | Account ID or Customer ID | |
| AutoBill Name, Rebill Name | Subscription Name | |
| Cancel a Subscription | Terminate customer access immediately | Disentitle Immediately |
| Give the customer a Refund for their unused time | Settle | |
| Send AutoBill Stop Notice | Send Cancel Notice | |
| Customer Accounts | Merchant Customer ID | Account ID or Customer ID |
| Customers | Accounts | |
| Transactions | Merchant Transaction ID | Transactions ID |